3D model creation
This article describes how to develop 3D models for the game. Blender is used as a reference tool.
Conventions
Sizes
- Import / export sizes: 1:1
- One tile size: 4m x 4m x 4m
- Door size: Minimum 2.0m x 1.6m
Blender naming (Object and mesh)
“ObjectName*_AA_BCDE”
- A: Variation of the model
- B: Special state [0 not special, 1 damaged]
- C: Upgrade type / growth
- D: Season [0 spring, 1 summer, 2 fall, 3 winter]
- E: Material layer (0 GeneralLookup, 1 UnshadedMaterial, 2 TransglowLookup)
- +"A": Animated
Example: "Production_WaterMill_00_0030A"
- Variation 00 (default)
- Not special (0)
- Upgrade 0 (none / default)
- Winter model (3)
- GeneralLookup (opaque 0)
- Animated (A)
Tile Logic
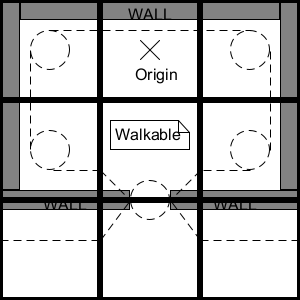
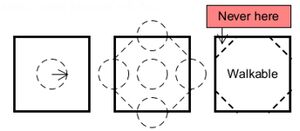
The origin of the mesh is where the people will stand or gather by default. Also where the mesh will be rotated. There are areas where people can walk and where they will never walk (check pathfinding) This can be used to plan doors or place decorations.
It's OK for vertices to be outside their cells. But remember that others can do the same, and it is important to be clear which cells the object occupies.
Pathfinding Considerations
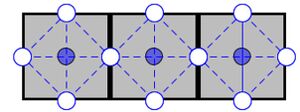
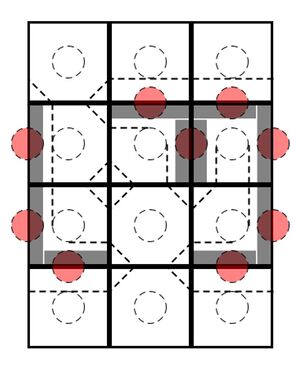
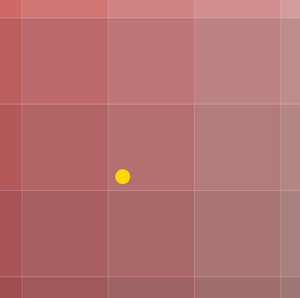
A cell has one center (starting point / goal, marked with a blue point) and 4 entrances / exits (white point) where the agents can walk.
All people can have an offset from their path to stand / walk (about r=0.7m).
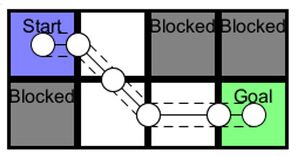
People will move from cell to cell in the following area and pattern:
Example: A house with 2 entrances. All cell centers are reachable, but 9 cell sides are blocked by walls (red circle).
Animation Humans / Animals
These animations are expected for each dynamic object:
- Walk-loop
- WorkHorizontally-loop (Interaction with bushes. Animals usually just eat)
- Sleep-loop
- Run-loop
- Idle-loop (long animation)
- Die
- PickFloor-loop (Interaction with grass and things from the floor. Animals usually just eat)
- HammerFloor-loop (usually only humans, not used for animals)
- Talk-loop
- Attack-loop
They need to be set as a NLA tracks in Blender and exported to be understood by the engine.
Time conventions for Walk-loop and Run-loop: They are normalized to 1 meter per second. So the ground contact point should always move at 1m/s. It will be sped up by the actual speed in the game. All other animations are set to 1s = 1s.
UV Unwrap
Of Life and Land does not use a classic texturing approach. Instead UV points are collapsed into a single point cluster by scaling them down to zero. This cluster is then positioned on the color lookup table to define color and material properties.
You can give different colours to different parts of your model by unwrapping different parts into different clusters and positioning them accordingly.
Materials & Colors
Of Life and Land makes use of a color lookup table with integrated subtables. This is a texture, in which all possible colors are predefined in color sets, which in turn are used by three different materials to setup different material properties such as roughness, metallic or transparency. This technique is used to significantly improve performance.
Color Lookup Table
Structure
The color lookup table is divided in 4 areas where each area represents different material properties. An area consists of 49 differents hues with 16x16 different subcells of saturation and value.
To set the color of a model or parts of it, collapse the corresponding UVs to a singular point by scaling them to zero and by positioning the point in the correct subcell. Depending on where you place the point in the subcell, you address different material parameters (as a subtable in the color lookup table) described in the next sections.
Shaded
For all opaque objects such as wood, stone or metal use the GeneralLookup Shader. Depending on where you place the UVs on the texture, you can define the following:
- Upper left area: Roughness & Metallic
- Lower left area: Emission
The right half of the texture is currently not in use and should not be used.
Setting Material properties by color
To set the material properties of a color, place the UVs in the correct subcell in the correct area. Depending on where the UVs are positioned in a subcell, material properties are applied by the shader.
| Header text | Header text |
|---|---|
| Upper left corner: Reflectiv, non metallic
For example wet surfaces | |
| Upper right corner: non reflectiv, non metallic
For example stone or wood | |
| Lower right corner: non reflectiv, metallic
For example unpolished or rusty metall, fake shadows | |
| Lower left corner: reflective, metallic
For example: Polished metall or mirrors |
If you use a subcell in the lower left area of the texture, you’ll modify how emissive the object is eg. how much it glows instead of roughness/metallic.
Unshaded (Additive Material)
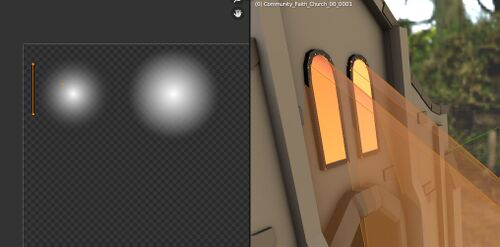
This shader is mainly used to create fake softlights, flares or light rays.
The technique are the same as in the shaded version but depending on UV position, you’ll modify other material properties:
- Upper left area: Distance Fade Effect
- Upper right area: Billboard Mode
The lower half of the texture is currently not in use and should not be used.
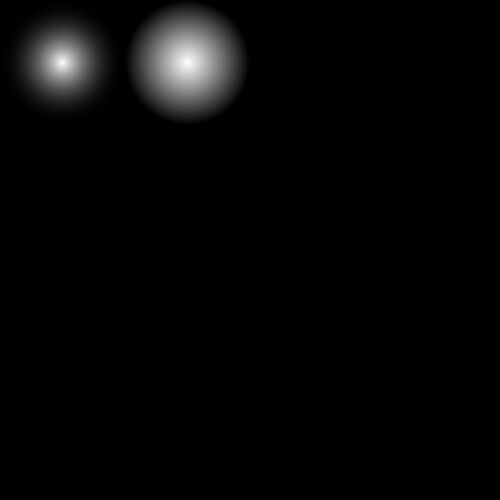
UV1: Alpha Gradient
To properly define the alpha gradient, don’t scale down the UVs to a single point cluster, instead create a proper flat unwrap. Change position, rotation and scale of the UVs until you get the right effect.
UV2: Logical control
Use the UV2 channel to control distance fade. The distance fade effect defines how soft the transition is, if your geometry intersects with other geometry (for example a fake light beam with a house). You can define the effect depending on your UVs X- and Y-coordinates on the subcell:
- X: Minimal Influence or how visible the effect is at least (0 = not visible, 1 = visible)
- Y: Distance Fade Effect or how soft is the transition (0 = hard, 1 = very soft)
You can fine control the fade effect by collapsing the UVs to a straight line instead of a point.
Color
To set the color, apply vertex colors to the model. As the effect is additive, black means it is invisible and brighter colors are more visible. You can use it to add additional effects.
Transparent
This shader is mainly used for transparent surfaces like water or glass. The technique and color sets are the same as in the shaded version but depending on UV position, you’ll modify other material properties:
- Upper left area: Transparency and roughness
The rest of the texture is currently not in use and should not be used.
Export
All static objects are exported with Collada (.dae):
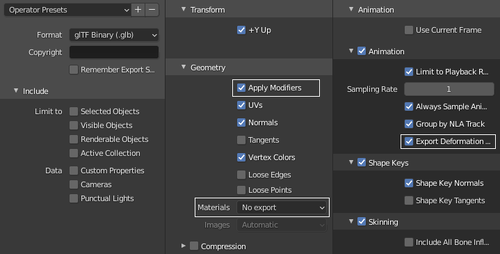
All dynamic objects are exported with glTF 2.0 (.glb):
Tips
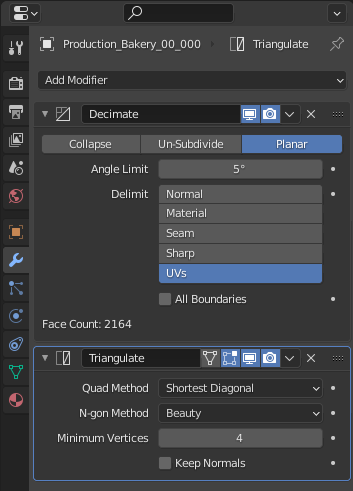
To prepare the model for export, add a Triangulate Modifier and a Decimate set to Planar and the delimit option set to UVs.
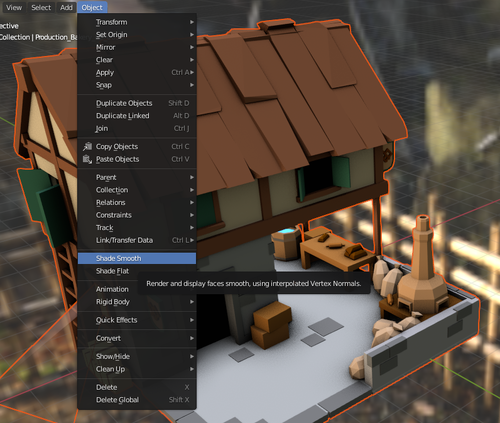
Use “Shade Smooth” before export to save a lot of vertices (file size & performance). The engine will shade it flat in the correct way automatically.
- Blender Batch Rename: CTRL + F2
- Blender template version blender-2.93.18-LTS:


